CLARK TEEPLE
  • Home
  • CV
  • Research
  • Publications
  • Other Experience
    • Academics
    • Senior Design: ENG 490
    • MIT Lincoln Lab
    • Kandu Incorporated
  • Just 4 Fun!

Wifi-Enabled Humidifier

1/9/2017

 
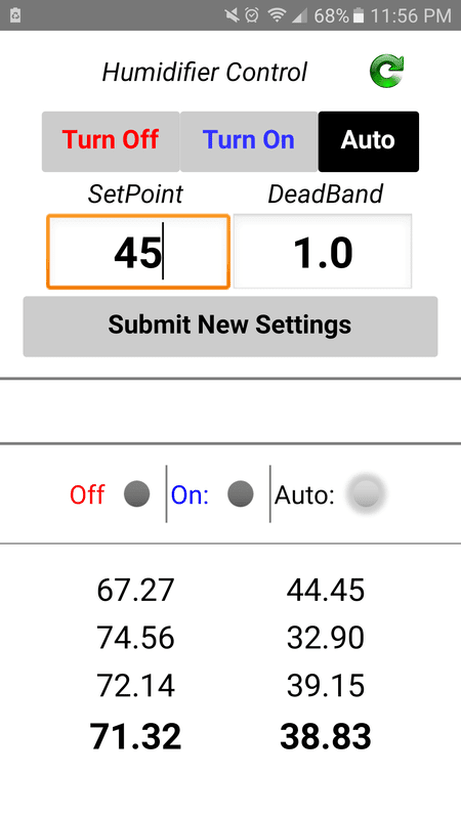
If you live in a climate that gets winters, you'll generally notice that the humidity drops substantially indoors during the winter. You'll also be familliar with chapped lips, sinus congestion, and dry skin casued by low humidity. In my case, I was seeing humidity measurements of less than 20%. 

Now that I have my sensor network set up and working reliably, I wanted to use that to regulate humidity!

Materials:
  • ESP8266 NodeMCU 12e Board  (Arduino-compatible development board with Wifi connectivity)
  • 120V 10A Relay (5V control signal) (Arduino-compatible relay with screw terminals)
  • Cheap Humidifier (Very basic humidifier from Amazon. This one is completely electrical (just basic electrical switches)
  • MicroUSB cable and changing brick (cheap from Amazon)

Software:
  • Custom Android App (It allows me to set the state of the humidifier as well as the setpoint)
    • I used MIT App Inventor to make this. It's pretty straighforward to use!
  • Another Thingspeak channel (My Android app spits settings into it)
  • Custom Arduino Code (It reads humidity data from my main ThingSpeak channel and compares it to settings from the settings ThingSpeak channel)
Results:
  • Hardware: Hacking the Humidifier
    • I hacked the humidifier by putting the relay as a switch in line with one of the mains voltage terminals.
    • I wired the relay to be normally closed, so if the MCU isn't working or the internet is out, I can still use the humidifier normally without any modifications or issues.
    • The MCU board passes power and signal to the relay using the power pins and a GPIO pin.
    • Now I can programmatically turn the humidifier on and off. I left the original power dial set to "high".
  • I made a custom Android App. It works great!
    • It pulls the current temperature and humidity data from my main ThingSpeak channel and displays them all .
    • It pulls humidifier settings and updates the buttons and settings
      • On/Off/Auto (On = Always On,  Off = Always Off, and Auto turns the humidifier on or off to maintain the setpoint )
      • Humidity Setpoint (the target humidity to maintain)
      • Deadband (The amount of wiggle room around the target humidity
        •  I just have an On-Off Relay actuator, so I have built in some hysteresis in the control loop to avoid turning the relay on and off too much
    • You can set these 3 settings, then submit them.
    • Since ThingSpeak only allows incomming data every 15 sec, The app forces you to wait for 15 seconds before submitting settings again. 
Picture
  • Custom Arduino Code
    • Algorithm:
      • ​It reads the latest average humidity data from my main ThingSpeak channel.
      • It then enters a loop
        • The Humidifier settings are read from the humidifier channel.
        • The program decides what to do next based on the following logic:
          • If the Humidifier is set to ON, set the relay to the "on" position ​(This is the resting position).
          • If the Humidifier is set to OFF, set the relay to the "off" position.
          • If the Humidifier is set to AUTO:
            • ​If the average humidity is lower than the "setpoint" - "deadband",
              • then turn the relay "on"
            • ​If the average humidity is lower than the "setpoint" - "deadband",
              • then turn the relay "on"
            • ​If the average humidity is in the deadband
              • ​then don't change the relay state.
        • ​​​wait for 2 sec.
      • After ~60 sec (timed based on how long it takes to perform 1 iteration of the inner loop and doing that loop several times)
        • ​​exit the inner loop
        • repeat the whole process, gathering new sensor data.
    • Sensor data is only updated roughly every minute, so this code makes sure we don't spend power and bandwidth gathering the same data over and over.

Wifi Sensor Modules

1/9/2017


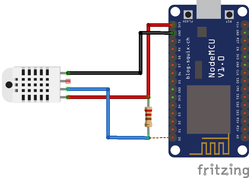
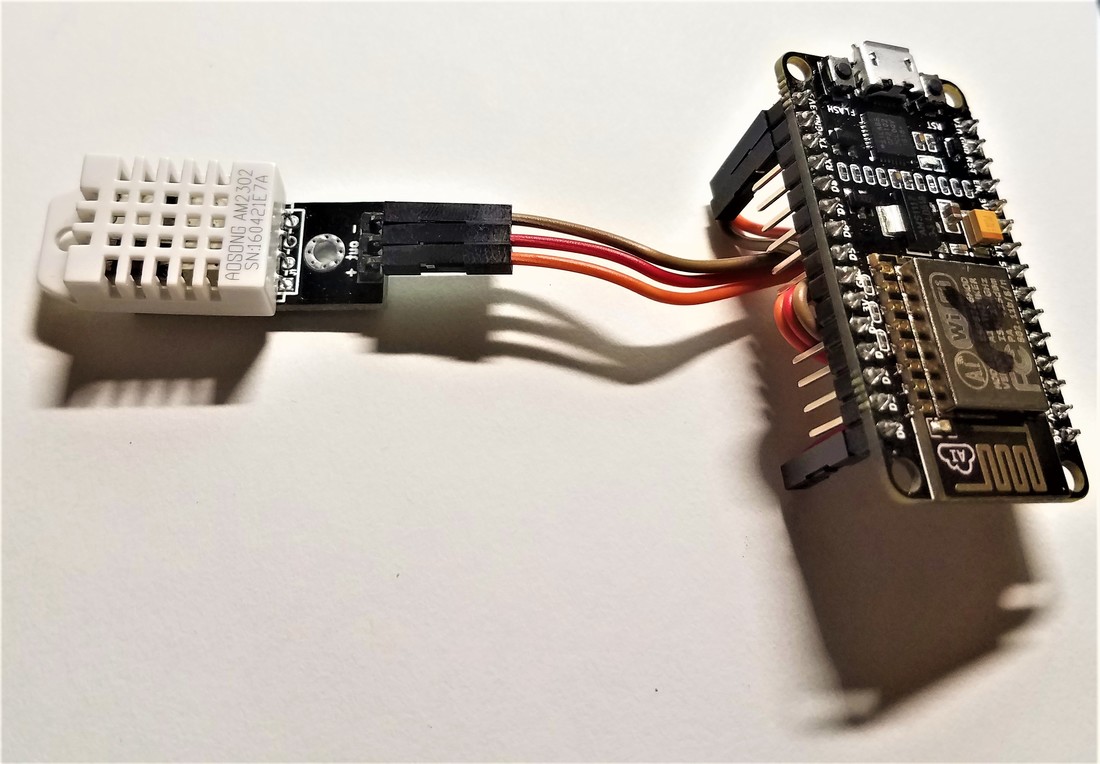
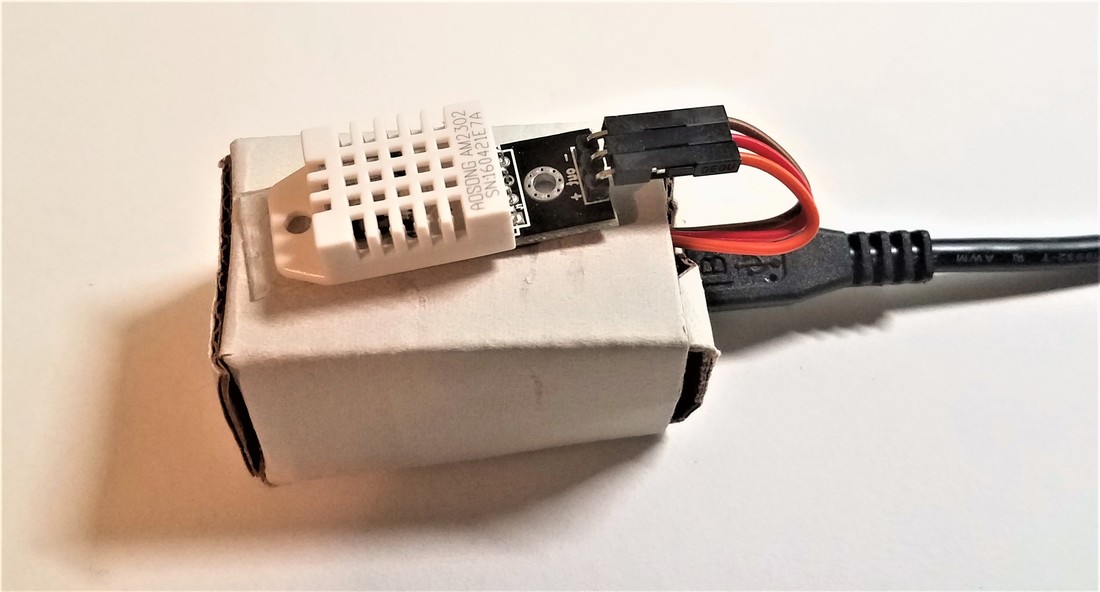
Materials (for 1 sensor module):
  • ESP8266 NodeMCU 12e Board  (Arduino-compatible development board with Wifi connectivity)
  • DHT22 Temperature/Humidity Sensor (Arduino-compatible temp/humidity sensor. It's got better temperature resolution than the cheaper DHT11, and a larger working range for temp and humidity measurements)

Software:
  • Arduino IDE
    • ESP8266 NodeMCU 12e board libraries need to be installed.
    • ESP8266Wifi library, ThingSpeak library, and DHT libarary need to be installed
  • ​ThingSpeak.com
    • ​Set up ThingSpeak channels with several fiel
  • Mobile Phone App
    • I wanted to be able to check on my sensors frome anywhere with an internet connection. Luckily there are many to choose from on Android.
Results:
  • Hardware:
    • The actual board and sensor setup is easy. My sensors have built-in pullup resistors in them, so I can directly connect them to the power and GPIO pins of the ESP8266 dev board.
    • I made a quick cardboard housing for the sensors. There is a bright blue LED that blinks every time the sensor data is read, and the housing suppresses that light.
Picture
Schematic of the circuit
Picture
ESP8266 NodeMCU 12e dev board connected to a DHT22 temp/humidity sensor.
Picture
The whole board with a cardboard housing to seal it up. This keeps the (very) bright blue activity light from blinking all night!
  • My main ThingSpeak channel is public. Take a look!
    • ​I set up ThingSpeak channels with several fields.
      • Due to quotas on how fast you can write to ThingSpeak (every 15 seconds per channel), I set up 1 channel per sensor.
      • Each sensor channel has 3 fields (temp, humidity,  and an error channel).
      • This allows me to write data from many sensors simultaneously without worrying about timing issues.
    • Each channel generates unique API Keys that can be used to read and write data.
    • ThingSpeak integrates MATLAB functionality directly, so I set up a triggered event to pull the sensor data from all of the different sensor channels, calculate the average, then put the  all of this information in another channel (my main channel).
  • Mobile Phone Apps Galore!
    • Android: there are a ton of free apps that allow you to view data from ThingSpeak
      • ThingView App
      • IoT ThingSpeak Monitor Widgit
      • At least 3 others with "ThingSpeak" in the title, and many others with compatibillity​​
    • iPhone: there are no official Apple options that I know of. Sorry apple fanboys, you're out of luck!

Introduction

1/9/2017

 
Background:
This has been an on-going project of mine. It all started when I moved to Cambridge, MA for grad school. My apartment has really old heating and no central air, so naturally the climate inside varies pretty substantially from hour to hour.

Question:
Wouldn't it be cool if I could put a bunch of sensors around my room to get information about how the temperature and humidity change in different locations over time?

Answer:
IT WOULD BE AWESOME!
 
Implementation:
  1. Arduino Programming:
    1. Arduino is super convenient to use as the basis for this project for a few reasons:
      1. Many open-souce libraries exist for it
      2. The boards are super cheap
      3. There are a lot of cheap Arduino-compatible sensors and actuators out there.
  2. Wifi Connectivity:
    1. The abillity for my boards to be connected to the internet is crutial
      1. There are a few cheap wifi modules that are Arduino compatible. In fact there are cheap development boards that include an MCU connected to a built-in wifi module, and work with the arduino IDE (ESP8266 NodeMCU 12e). More on this in a future post.
      2. Wifi means I can build a modular sensor network. Each node can transmit data wirelessly (i.e. the only wire input is power).
  3. Data Storage and Accessibility 
    1. The final piece of the puzzle is a place to store all of this sensor data in a place where it will be useful. Interestingly, Mathworks has already developed a web service that allows users to dump data to thier servers.
      1. ThingSpeak.com is a free data hosting website designed specifically for IoT projects.
      2. There are a few free Android apps that allow users to display data from ThingSpeak Channels.
      3. There is an arduino library that reads and writes to ThingSpeak.
      4. The ThingSpeak API is open source and well documented.
      5. Since it's owned by Mathworks (which owns MATLAB), you can easily create custom Matlab scripts to analyze data. Better yet, the scripts are stored and run on thier server, and can be set to run in response to data being pushed!

    Author

    Write something about yourself. No need to be fancy, just an overview.

    Archives

    January 2017

    Categories

    All

Powered by Create your own unique website with customizable templates.
  • Home
  • CV
  • Research
  • Publications
  • Other Experience
    • Academics
    • Senior Design: ENG 490
    • MIT Lincoln Lab
    • Kandu Incorporated
  • Just 4 Fun!